We have already blogged that how we can create a bootable DVD of Windows Vista and  Windows 7 using WAIK(Windows Automated Installation Kit) as Microsoft does. WAIK is specifically targeted to Windows Vista and Windows 7 and nobody likes to download such a big Toolkit to create just a bootable DVD.

Today we have come with a simple and straight how-to guide, which explains how we can create bootable DVD of Windows Vista/7 using Nero burning software.

(We are using Nero because it is one of the popular CD/DVD burning software and can be available easily. You can grab the Trial version of Nero official website.)

Requires:

  • Windows Vista/Windows 7 Installation Source Files
  • Blank DVD and Nero.

How To:

  1. First of all, install Nero and prepare your Installation source files by copying them to particular folder or directory. Lets say- all files are copied to C:\DVD folder.
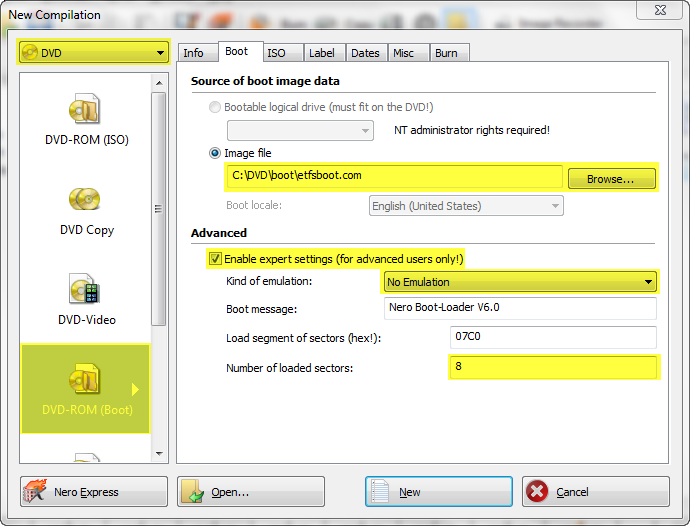
  2. Start Nero Burning ROM (Go to Start >> All Programs >> Nero >> Nero 9 and click on Nero Burning ROM). On New Compilation dialog box, Select DVD as compilation and then DVD-ROM (Boot).
  3. Step 1 - Nero New Compilation

  4. On Boot tab and locate boot image file using Browse button. (Windows Vista and Windows 7 installation source contain boot image file called etfsboot.com in Boot directory) See the above image.
  5. Windows Vista x64 Installation files doesn’t contain etfsboot.com, so you can use the same file from x86 version.
  6. Now under Advanced, check Enable expert settings (for advanced users only), set emulation type as No Emulation &  number of loaded sectors as 8 and leave rest of settings intact. (1 sector = 512Bytes, etfsboot.com requires 4.0KB to boot DVD)
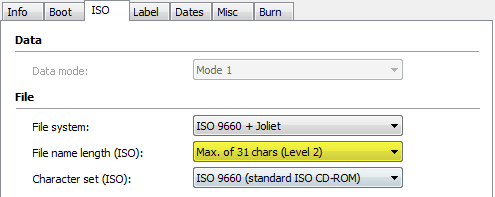
  7. On ISO tab, select File name length as Max. of 31 chars (Level 2). Now move Label tab and set the label of disc, say “Windows 7 DVD”.
  8. Step 2 - Nero ISO tab

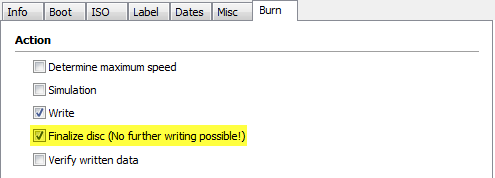
  9. On Burn tab, don’t forget to check Finalize the disc (No further writing possible!). Now almost everything is done, so click on New to add Windows 7 Installation Source files.
  10. Step 3 - Nero Burn tab

  11. Just select all files and folders from DVD and drag them under to Windows 7 DVD. That’s it, now click on Burn button on toolbar or choose Recorder menu >> Burn Compilation. Insert the blank DVD into drive and set appropriate burning speed. It is recommended to burn disc lower speed (2x or 2.4x) for better results.
Applies To:

  • Windows Vista (x86 & x64)
  • Windows 7 (x86 and x64)
  • Windows Server 2008 (x86 and x64)
  • Windows Server 2008 R2

94 responses to “How to Create Windows 7 Bootable DVD using Nero”

  1. FekaTV Avatar
    FekaTV

    mangostain, this is how I did:
    1. Open MagicISO
    2. File/New, click Bootable CD/DVD Image
    3. Settings, as discribed above (Nero): Select From Bootable Image File, boot image file called etfsboot.com in Boot directory, check Enable expert settings (for advanced users only), set emulation type as No Emulation, sector count = 8, load segment = 7C0
    And that’s it, it worked for me.

  2. mangostain Avatar
    mangostain

    I forgot something, when i make the 6gb dvd, the disk works fine… but in UDF got the correct size (3,4gb aprox) but appears an missing install.wim error message in the windows setup

  3. mangostain Avatar
    mangostain

    I used the magiciso to make the iso bootable, then I active the iso bla blah Joliet… and the result… a bigger disk with 6gb size rather than 3,4 gb as it should to be…. If I activate the UDF option in MAgicISO, the size of the disk is fixed.. but it appear an error saying that install.wim is not found or missing… :S

  4. FekaTV Avatar
    FekaTV

    Use MagicIso instead of Nero. It can create the bootable ISO correctly with the large .wim file.

  5. Ryan Avatar
    Ryan

    It’s nice to read a good blog post. I enjoy many of the articles on your site.

  6. ansh Avatar
    ansh

    i hv a solution rather than it go to this web site http://www.askvg.com/create-windows-7-bootable-usb-drive-or-dvd-using-official-windows-7-usbdvd-download-tool-from-microsoft/ and surely u will be able to create ur bootable disk of any window…it is guaranteed as i hv also done this…and welcome

  7. Piyush Dhangar Avatar
    Piyush Dhangar

    Hi, Did anyone got resolution for — “install.wim” is 2GB size and can not be used on a ISO file system, Use UDF file system– issue.

  8. mostafa Avatar
    mostafa

    i do all this steps and when i drag the files under win 7 it appears to me (instal file is more than 2GB ..use udf compilation) pls help me

  9. Metch Avatar
    Metch

    Bro I got a lil problem, when I try to drop the files in to the compliation comes back saying that the file the file “install.wim” is 2GB size and can not be used on a ISO file system, Use UDF file system to burn big files…

    Using 10 professional
    windows 7 64x

    any thoughts?

  10. Anand Avatar
    Anand

    ok i m now starting…it works!

Leave a Reply

Your email address will not be published. Required fields are marked *