We have already an article to merge all editions of Windows Vista into single DVD and it works with Windows 7 as well. Our an reader wished to have an simple step by step guide to create Windows 7 AIO DVD or you can say the biggest AIO, that have all x86 and x64 editions including Enterprise editions. Finally we have done it and managed to fit it into a 4GB DVD, that is the most interesting thing. So without wasting your time, Lets start…

Requires:

  • Windows 7 DVD/ISO (x86 & x64) – You can choose any edition, because the DVD holds the all editions i.e. Starter, Home Basic, Home Premium, Professional and Ultimate.
  • Windows 7 Enterprise DVD/ISO (x86 & x64) – Windows 7 Enterprise is not available through retail channels.
  • Windows Automation Installation Kit (WAIK for Windows 7)
  • Blank DVD (DVD5 – 4GB in size) compatible DVD Burner and CD/DVD burning software (like Nero, ImgBurn)

How To:

(We have merged all x64 editions one by one into x86 DVD, because x64 DVD has 64-bit contents that can’t run under Win32 mode but Vista x86 content can run under 64-bit environment easily under SYSWOW64 and x64 DVD has only less editions than x86 DVD)

1. Install WAIK and the burning program & create folders as shown in figure:
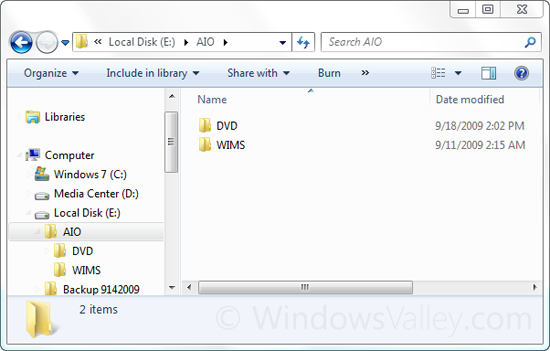
Create the folders hierarchy

We created a folder named AIO on the root of E: drive and then two subfolders named DVD and WIMs in AIO.

2. Now copy/extract the content of Windows 7 x86 edition into DVD folder and copy/extract all WIM image file (install.wim, located under sources folder) into WIMs folder.
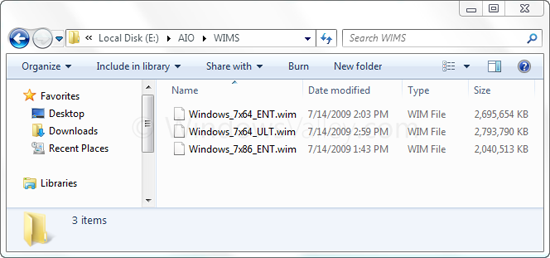
Copy or Extract WIM files

We extracted and renamed all WIM images like that.

3. First of all unlock the x86 editions, delete ei.cfg file from AIO\DVD\Sources folder. For more information: Unlock all editions from Windows 7 ISO image (x86 and x64)

4. Run WAIK command prompt (Deployment Tools Command Prompt) As Administrator

Start > All Programs > Microsoft Windows AIK > Deployment Tools Command Prompt
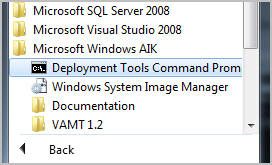
Run WAIK Command Prompt as Administrator

Each edition has an unique INDEX NO. in the install.wim (WIM file), you can check using the following command.

Imagex /info <path_of_wim_file>

The List of INDEX NOS in different WIM files:

Windows 7 x86 Windows 7 x64 Windows 7 Enterprise x86 Windows 7 Enterprise x64
Starter – 1 Home Basic – 1 Enterprise – 1 Enterprise – 1
Home Basic – 2 Home Premium – 2
Home Premium – 3 Professional – 3
Professional – 4 Ultimate – 4
Ultimate – 5

These INDEX NOS will be needed, when we export one edition from an WIM file to another one.

5. Now execute the following command with appropriate INDEX NO to export a copy of the specified edition to another WIM file.

Imagex /export <path_of_source_wim_file> <index_no> <path_of_destination_wim_file> <description_of_edition>
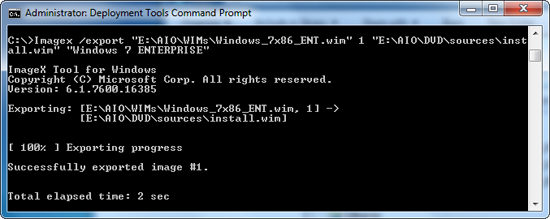
Exporting a copy of Windows 7 Enterprise

For Us, the commands will be as follows:

For Windows 7 Enterprise x86

Imagex /export “E:\AIO\WIMs\Windows_7x86_ENT.wim” 1 “E:\AIO\DVD\sources\install.wim” “Windows 7 ENTERPRISE”

For Windows 7 Home Basic x64

Imagex /export “E:\AIO\WIMs\Windows_7x64_ULT.wim” 1 “E:\AIO\DVD\sources\install.wim” “Windows 7 HOMEBASIC (x64)”

For Windows 7 Home Premium x64

Imagex /export “E:\AIO\WIMs\Windows_7x64_ULT.wim” 2 “E:\AIO\DVD\sources\install.wim” “Windows 7 HOMEPREMIUM (x64)”

For Windows 7 Professional x64

Imagex /export “E:\AIO\WIMs\Windows_7x64_ULT.wim” 3 “E:\AIO\DVD\sources\install.wim” “Windows 7 PROFESSIONAL (x64)”

For Windows 7 Ultimate x64

Imagex /export “E:\AIO\WIMs\Windows_7x64_ULT.wim” 4 “E:\AIO\DVD\sources\install.wim” “Windows 7 ULTIMATE (x64)”

For Windows 7 Enterprise x64

Imagex /export “E:\AIO\WIMs\Windows_7x64_ENT.wim” 1 “E:\AIO\DVD\sources\install.wim” “Windows 7 ENTERPRISE (x64)”

6. Once you are done! The WIM image in AIO folder will be an Universal WIM file, which will have all editions of Windows 7. The size of WIM file would be approx 3.41GB. Now DVD folder is ready and you can make bootable DVD and UFD to take a shot.

How to make bootable UFD: Install Windows Vista and Windows 7 using bootable USB storage device.

How to make bootable ISO or DVD: Create bootable Windows Vista and Windows 7 DVD or Create bootable Windows 7 DVD using Nero.

7. Windows 7 AIO is ready now! You have followed simple 7 steps to create Windows 7 All-In-One DVD, that includes total 11 editions and fit into a single layer DVD.
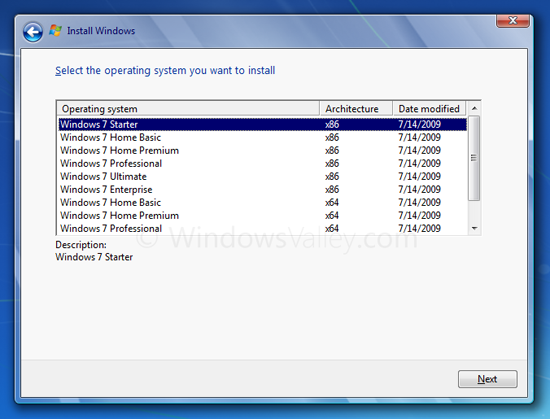
Apart from all these things, it save your 3 blank DVDs and lots of bandwidth, which could be used to download different editions of Windows7. So install it and have fun…

Applies To:

  • Windows 7 family (It also works with Windows 7 SP1)
  • Windows Vista family
  • Windows Server 2008

– UPDATED 02/22/2011

193 responses to “Create Windows 7 AIO (All In One) DVD – Merge All editions of Windows 7 in a DVD”

  1. Davidtse916 Avatar
    Davidtse916

    Thanks very much for your instructions!

  2. Juan Avatar
    Juan

    Great tutorial!!! This really helped me a lot because I sometimes need to install different versions of Windows 7 SP1 (both x86 & x64), and with this, I only have to bring out a single DVD instead of 2 DVDs with all of the versions unlocked.

    I have just 1 question, is it possible to integrate the Language Packs updates for both Ultimate versions (x86 & x64)? Or merge the English and Spanish DVDs (all 4 of them unlocked) into a single ISO? I wouldn’t mind if the size was bigger than 4.7 gigs, but this would really help me even more. However, if there isn’t a way to do so, I guess I can’t do anything about it.

    Thanks once again!!

    1. David Avatar
      David

      yes you can…..but sorry i can not do that yet,i have heard you can do it in a vertual box (this is what i am trying now).. you an find a free vurtual box on line,,download one you like then fwhen you do the latest updets you can then do a back up off system,do not put any othere programs in there as you want to use it for creating your aio with sp1 and language pcks,you will need to find a tuturial on how to do it there is many you can look up on line…….
      thank you

  3. David Avatar
    David

    Sorry made a mistake, where it says select folder to work with, THIS WILL BE YOUR WINDOWS 7 ISO DOWNLOAD X86 AND X64,Sorry about that,Also if you do a UPGRADE from windows xp and vista make sure you have the sp packs installed then do the upgrade…
    THank you once again

  4. David Avatar
    David

    HI
    I found this site and tryed the waik but was to hard for a dummy like me.
    A friend told me about anothere way to do it and i tried it and it worked well,(If i can do it anyone can),so here is how to do it,Download WinAIO Maker Professional v1.3( comes in zip file,you will need to unzip it).Make three files and name them what you like,(say windows 7 AIO, Windows & x86, Windows 7 x64, easy to find then), download any version of windows 7, unzip x86 into the windows 7 x86 folder and x64 into x64 folder, REMOVE the ei.cfg like above instructions, Now open the winAIO Maker Professional and then click on SELECT WIMS, box will open up and all you need to do is find where you put the folders x86 and x64,select x86 first,open it select source,instal.wims you will see it apper in the bottom box,click open in winAIO it will appear in the win box do the same for x64 when all that done you can now click on AutoAIO,then Select folder to work with ISOs,this will be your Windows 7 AIO folder,then Select exact x86 ISO,i found this to be your windows 7 iso x86 folder,then Select exact x64 ISO, same as before, windows 7 iso x64 folder, now this is important you must tick the enable x64 recovery mode then click on Start Compilation. All will fit on to a 4.7gig disk,I had done this with windows 7 sp1 on both x86 and x64 download and only came up to 4.1 gig.. good luck if you try this way..as i said this is for dummys and i am the biggest one around,,thank you all

    1. Ravi Avatar
      Ravi

      this part is confusing ,¨¨i found this to be your windows 7 iso x86 folder,then Select exact x64 ISO, same as before, windows 7 iso x64 folder,¨¨

      if we already extracted and deleted the ei.cfg file which in the last step we select the iso images ?

  5. Bruuuuce Avatar
    Bruuuuce

    This was a great find and i’m making the ISO now.

    However i’ve been reading the comments and asking about SP1. Can you slipstream SP1 into the whole DVD, or do you have to do this before the whole process?

    Perhaps that could be included in this to ensure that if someone wants SP1 included that they slipstream it first before starting the several hour process?

  6. polferis Avatar
    polferis

    Hello! Manny thanks for this great tutorial! It was verry helpfull for me! I`v succeded to realise an AIO Windows 7 x86/64 bit. But my ISO image size is exactly 6GB. I don`t know why it`s so large. Might be so, becouse I used only ISO images with SP1? Or, did I do some mystakes? I followed every single step exactly as presented here. Please, can you clarify me a little? Thank you. Once again, thank you for your great work!
    I am waiting for your answer!
    Excuse my english, please!

  7. Steffan Long Avatar
    Steffan Long

    This doesn’t seem to work anymore. The newest images from TechNet, the “with_sp1_dvd_u” images, work fine for the entire process, but when I try to install Windows 7 Ultimate x64 from the disc it fails at 100% with some obscure error.

    Any hope for this? Or is settling for the older images required?

  8. Morten Avatar
    Morten

    Hi!

    First of all, great article!

    I have a question. Is it possible to create a multi-language DVD?

  9. adam Avatar
    adam

    When I enter
    Imagex /export C:\AIO\WIMs\Windows7-86.wim 1 | C:\AIO\DVD\sources\install.wim “Windows 7 Starter”
    I get a box come up asking me to choose the default program to open .wim files with

  10. adam Avatar
    adam

    When I run the Imagex commands windows tries to open the .wim files.

    anyone know what I can do ?

    1. Ramesh Avatar
      Ramesh

      Will you elaborate more about your problem?

Leave a Reply to Joanna Cancel reply

Your email address will not be published. Required fields are marked *