We have already an article to merge all editions of Windows Vista into single DVD and it works with Windows 7 as well. Our an reader wished to have an simple step by step guide to create Windows 7 AIO DVD or you can say the biggest AIO, that have all x86 and x64 editions including Enterprise editions. Finally we have done it and managed to fit it into a 4GB DVD, that is the most interesting thing. So without wasting your time, Lets start…

Requires:

  • Windows 7 DVD/ISO (x86 & x64) – You can choose any edition, because the DVD holds the all editions i.e. Starter, Home Basic, Home Premium, Professional and Ultimate.
  • Windows 7 Enterprise DVD/ISO (x86 & x64) – Windows 7 Enterprise is not available through retail channels.
  • Windows Automation Installation Kit (WAIK for Windows 7)
  • Blank DVD (DVD5 – 4GB in size) compatible DVD Burner and CD/DVD burning software (like Nero, ImgBurn)

How To:

(We have merged all x64 editions one by one into x86 DVD, because x64 DVD has 64-bit contents that can’t run under Win32 mode but Vista x86 content can run under 64-bit environment easily under SYSWOW64 and x64 DVD has only less editions than x86 DVD)

1. Install WAIK and the burning program & create folders as shown in figure:
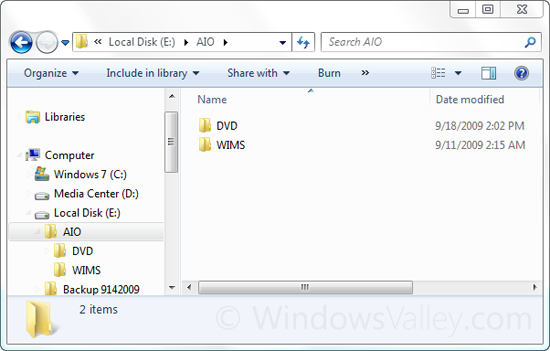
Create the folders hierarchy

We created a folder named AIO on the root of E: drive and then two subfolders named DVD and WIMs in AIO.

2. Now copy/extract the content of Windows 7 x86 edition into DVD folder and copy/extract all WIM image file (install.wim, located under sources folder) into WIMs folder.
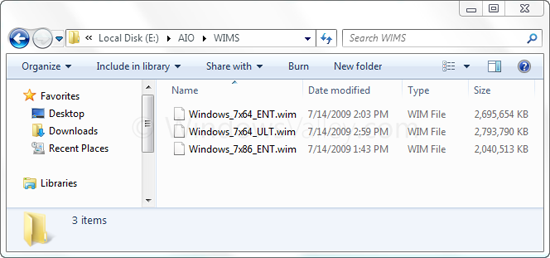
Copy or Extract WIM files

We extracted and renamed all WIM images like that.

3. First of all unlock the x86 editions, delete ei.cfg file from AIO\DVD\Sources folder. For more information: Unlock all editions from Windows 7 ISO image (x86 and x64)

4. Run WAIK command prompt (Deployment Tools Command Prompt) As Administrator

Start > All Programs > Microsoft Windows AIK > Deployment Tools Command Prompt
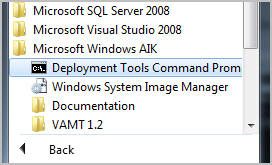
Run WAIK Command Prompt as Administrator

Each edition has an unique INDEX NO. in the install.wim (WIM file), you can check using the following command.

Imagex /info <path_of_wim_file>

The List of INDEX NOS in different WIM files:

Windows 7 x86 Windows 7 x64 Windows 7 Enterprise x86 Windows 7 Enterprise x64
Starter – 1 Home Basic – 1 Enterprise – 1 Enterprise – 1
Home Basic – 2 Home Premium – 2
Home Premium – 3 Professional – 3
Professional – 4 Ultimate – 4
Ultimate – 5

These INDEX NOS will be needed, when we export one edition from an WIM file to another one.

5. Now execute the following command with appropriate INDEX NO to export a copy of the specified edition to another WIM file.

Imagex /export <path_of_source_wim_file> <index_no> <path_of_destination_wim_file> <description_of_edition>
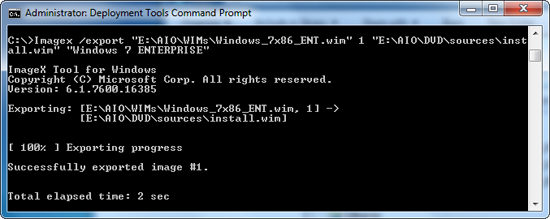
Exporting a copy of Windows 7 Enterprise

For Us, the commands will be as follows:

For Windows 7 Enterprise x86

Imagex /export “E:\AIO\WIMs\Windows_7x86_ENT.wim” 1 “E:\AIO\DVD\sources\install.wim” “Windows 7 ENTERPRISE”

For Windows 7 Home Basic x64

Imagex /export “E:\AIO\WIMs\Windows_7x64_ULT.wim” 1 “E:\AIO\DVD\sources\install.wim” “Windows 7 HOMEBASIC (x64)”

For Windows 7 Home Premium x64

Imagex /export “E:\AIO\WIMs\Windows_7x64_ULT.wim” 2 “E:\AIO\DVD\sources\install.wim” “Windows 7 HOMEPREMIUM (x64)”

For Windows 7 Professional x64

Imagex /export “E:\AIO\WIMs\Windows_7x64_ULT.wim” 3 “E:\AIO\DVD\sources\install.wim” “Windows 7 PROFESSIONAL (x64)”

For Windows 7 Ultimate x64

Imagex /export “E:\AIO\WIMs\Windows_7x64_ULT.wim” 4 “E:\AIO\DVD\sources\install.wim” “Windows 7 ULTIMATE (x64)”

For Windows 7 Enterprise x64

Imagex /export “E:\AIO\WIMs\Windows_7x64_ENT.wim” 1 “E:\AIO\DVD\sources\install.wim” “Windows 7 ENTERPRISE (x64)”

6. Once you are done! The WIM image in AIO folder will be an Universal WIM file, which will have all editions of Windows 7. The size of WIM file would be approx 3.41GB. Now DVD folder is ready and you can make bootable DVD and UFD to take a shot.

How to make bootable UFD: Install Windows Vista and Windows 7 using bootable USB storage device.

How to make bootable ISO or DVD: Create bootable Windows Vista and Windows 7 DVD or Create bootable Windows 7 DVD using Nero.

7. Windows 7 AIO is ready now! You have followed simple 7 steps to create Windows 7 All-In-One DVD, that includes total 11 editions and fit into a single layer DVD.
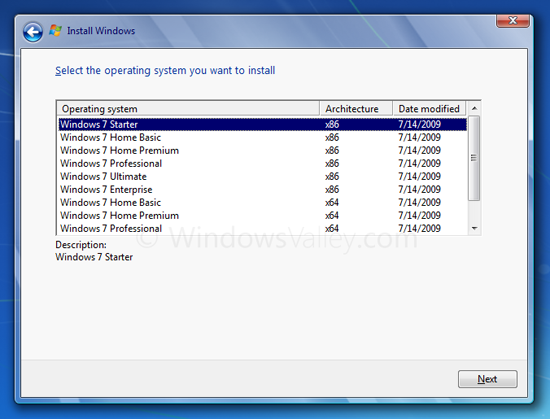
Apart from all these things, it save your 3 blank DVDs and lots of bandwidth, which could be used to download different editions of Windows7. So install it and have fun…

Applies To:

  • Windows 7 family (It also works with Windows 7 SP1)
  • Windows Vista family
  • Windows Server 2008

– UPDATED 02/22/2011

193 responses to “Create Windows 7 AIO (All In One) DVD – Merge All editions of Windows 7 in a DVD”

  1. Juan Carlos Avatar
    Juan Carlos

    Its the same to make whit windows 7 N version?

    1. Author Avatar
      Author

      Yes !! The process is the for Windows 7 N versions.

  2. faraz Avatar
    faraz

    hi

    how can i make multi wim from windows 7 and windows server 2008 r2?

  3. DonaldFaQ Avatar
    DonaldFaQ

    ok here is the answer my english is not so ggod sry, but there is a way to do this.

    Here we modify the DVD’s BCD, so as to add an x64 recovery option. The recovery option is just that: it cannot install. To improve user transparency, the boot timeout shall be set to 1 sec, so as to be unnoticeable if not needed, but a simple double-tap of an arrow kay at the “press any key to boot from CD/DVD” screen will show it.

    Ok, open an administative command prompt.

    Navigate to D:\AIO\DVD

    Now make a copy of the default loader by executing:

    Code:
    bcdedit /store boot\bcd /copy {default} /d “x64 Recovery Mode”

    This command shall tell you the GUID of the copy made, make a note of it.

    Next set the new loader to load the 64 bit PE by executing:

    Code:
    bcdedit /store boot\bcd /set {GUID} device ramdisk=[boot]\sourc64\boot.wim,{7619dcc8-fafe-11d9-b411-000476eba25f}

    bcdedit /store boot\bcd /set {GUID} osdevice ramdisk=[boot]\sourc64\boot.wim,{7619dcc8-fafe-11d9-b411-000476eba25f}

    (Replace {GUID} with the GUID you noted down)

    Finally, alter the boot timeout by executing:

    Code:
    bcdedit /store boot\bcd /timeout 1

    Stage 4: getting upgrade to work
    Now, the one problem left is upgrade installs on 64 bit. This involves hex editing files, and so breaks the digital signature, causing the ugly yellow UAC prompt. This is, I am almost ashamed to say, the first of two such cosmetic glitches.

    Now first open D:\AIO\DVD\setup64.exe in your hex editor.
    Search and replace all instances of the unicode string “sources\” with “sourc64\”. Although this breaks the signature, it does not break the program, because both strings are the same length.
    Now, open D:\AIO\DVD\sourc64\autorun.dll, and replace all instances of the unicode string “sources\setup.exe” with “sourc64\lunch.cmd”

    (in case you were wondering, it was going to be launch.cmd, but I had to drop one letter…)

    Now, create a file in D:\AIO\DVD\sourc64 called lunch.cmd containing exactly this:

    Code:
    setup.exe /m:sourc64 /installfrom:\sources\install.wim

    This is the cause of the second cosmetic glitch. A command prompt is briefly visible before setup is launched.

    Now, the autorun.inf must be modified so that it runs setup64 on x64 systems. Modify it so it contains:

    Code:
    [Autorun.Amd64]
    open=setup64.exe
    icon=setup64.exe,0

    [Autorun]
    open=setup.exe
    icon=setup.exe,0

    There is only one problem now. a little problem. with hex the data we destroyed the certificate of the file. if you run setup64 now there come a red shield , i think in english it calls unknown Publisher. this is all. if you booting from the menu you can change
    between Setup Windows or x64 repair function.

    THATS ALL !

  4. discordian Avatar
    discordian

    Nice tutorial, but one problem:
    The emergency/repair functions cant be started from DVD if the installed OS is x64. Would be of great help if anyone know if its possible to integrate that aswell

  5. Lex Avatar
    Lex

    Is it possible to do Multilanguage Install cd?
    Example: I have W7 Ultimate in english and russian language. And both in x64 & x86 version.

    How can I make W7 Install DVD with both languages?

    P.s. sorry for my bad english

  6. Steve Avatar
    Steve

    hey man nice tutorial. I would like to do the opposite is it possible. example i have an aio windows 7 dvd but not original modified for gaming and it has x64 and x32 in it and i would like to split them into 2 dvd’s one for x32 and other for x64

  7. jonescosmos Avatar
    jonescosmos

    Could there be a batch files that contains these commands and make the whole processes automated?

    1. SRC32 Avatar
      SRC32

      yes,
      bat commands below. INSTALLx86.WIM must be in same dir and INSTALLx64.WIM, ENTX86.WIM ENTX64.wim

      IMAGEX /export %CD%\INSTALLx86.WIM 1 %CD%\INSTALL.wim “WINDOWS 7 STARTER x86”
      IMAGEX /export %CD%\INSTALLx86.WIM 2 %CD%\INSTALL.wim “WINDOWS 7 Home Basic x86”
      IMAGEX /export %CD%\INSTALLx86.WIM 3 %CD%\INSTALL.wim “WINDOWS 7 Home Premium x86”
      IMAGEX /export %CD%\INSTALLx86.WIM 4 %CD%\INSTALL.wim “WINDOWS 7 Professional x86”
      IMAGEX /export %CD%\INSTALLx86.WIM 5 %CD%\INSTALL.wim “WINDOWS 7 Ultimate x86”
      IMAGEX /export %CD%\INSTALLx64.WIM 1 %CD%\INSTALL.wim “WINDOWS 7 Home Basic x64”
      IMAGEX /export %CD%\INSTALLx64.WIM 2 %CD%\INSTALL.wim “WINDOWS 7 Home Premium x64”
      IMAGEX /export %CD%\INSTALLx64.WIM 3 %CD%\INSTALL.wim “WINDOWS 7 Professional x64”
      IMAGEX /export %CD%\INSTALLx64.WIM 4 %CD%\INSTALL.wim “WINDOWS 7 Ultimate x64”
      IMAGEX /export %CD%\ENTX64.WIM 1 %CD%\INSTALL.wim “WINDOWS 7 Enterprise x64”
      IMAGEX /export %CD%\ENTX86.WIM 1 %CD%\INSTALL.wim “WINDOWS 7 Enterprise x86”

  8. mnemonic byte Avatar
    mnemonic byte

    Thanks for your AIO stuff, it’s great… Do you think that making a Windows-AIO is possible ? I mean XP_SP3 – VISTA_SP2 – Win7 … when booted from cd/usb, a menu showing what you want to install…
    if XP then go to Windows XP SP3 choice menu installation(includes x86 and x64)
    if Vista then go to Windows Vista SP2 choice menu installation(includes x86 and x64)
    if Win7 then go to Windows 7 choice menu installation(includes x86 and x64)
    I think it’s possible using a grub loader with 3 options menu, and when you choose the one you wish, then start the boot with Windows as usual…
    But I would prefer skiping the grub because I hate mixing linux with windows stuff… just use something like the tutorial above
    I do think that would be the peak with Windows AIO pack

  9. SilverGoldi Avatar
    SilverGoldi

    Thanks for the info & quick help …. ok i dont export 32 it o 64 bit..

    BTW is it possible to make aio of xp ? i.e. home , professional , media entre of 32 & 64 bits ??????????

  10. SilverGoldi Avatar
    SilverGoldi

    Ramesh kumar i was trying revert, copied 64 bit dvd files & trying to import x86 (32) Editions in it …….. but dont know the command for windows 7 starter edition can u please tell it
    trying same with vista & there i also dont know commands of x86 starter , x86 enterprise & x64 enterprise can u please explain ?????

    1. Author Avatar
      Author

      Let Install.wim of x86 editions has been reanmed as installx86.wim and copied to C:WIM folder.. You destination folder is C:DVD
      Imagex /Export C:WIMInstallx86.wim 1 C:DVDSourcesinstall.wim "Windows 7 STARTER"
      See the Index list and its same for Vista too. FYI don’t export 32bit images to 64bit images. Becoz 64bit binaries won’t execute on 32bit platform, when you try to execute setup.exe from Windows, instead of booting DVD.

Leave a Reply

Your email address will not be published. Required fields are marked *